3. Propose modifications to an electoral district
The IMT allows you to submit one or more a modification proposals online to a commission's proposal of electoral district boundaries or names. You can submit one proposal per electoral district.
Modify an electoral district
To modify an electoral district, you must first select it and complete the following steps:
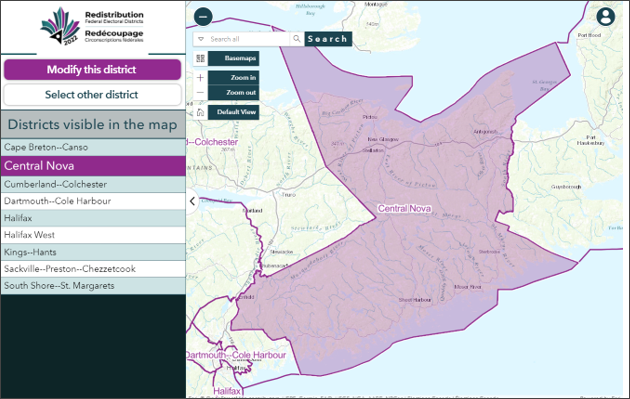
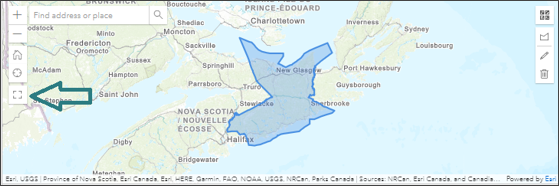
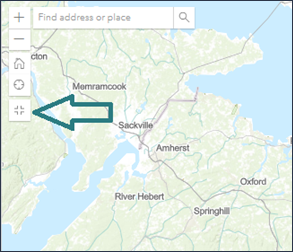
- Select an electoral district; for example, the electoral district of Central Nova (Insert 4). Once you have selected an electoral district, it will be highlighted in magenta.
- Select the Modify this district button in the electoral district panel.
Details of the modifications you want to make
When you select the Modify this district button, you will be redirected to a questionnaire that will allow you provide details on the changes you want to propose to the commission for the chosen electoral district. There are four parts to fill out:
- Modification of the electoral district name
- Modification of the boundary
- Justification
- Presentation at a public hearing
To be able to submit a valid modification proposal, you need to modify at least one of those parts. You must answer all fields marked with a red asterisk. The Back and Next buttons at the bottom of the page allow you to navigate between each part of the questionnaire.
Part 1 – Name modification
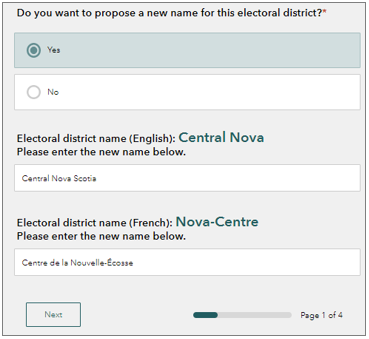
You will be asked to answer the following question: Do you want to propose a new name for this electoral district?
If you do not want to change the electoral district name, choose No and click Next.
If you want to propose a new name, choose Yes and write the new name in both languages in the fields provided (Insert 5).
Then click Next.
Part 2 – Boundary modification
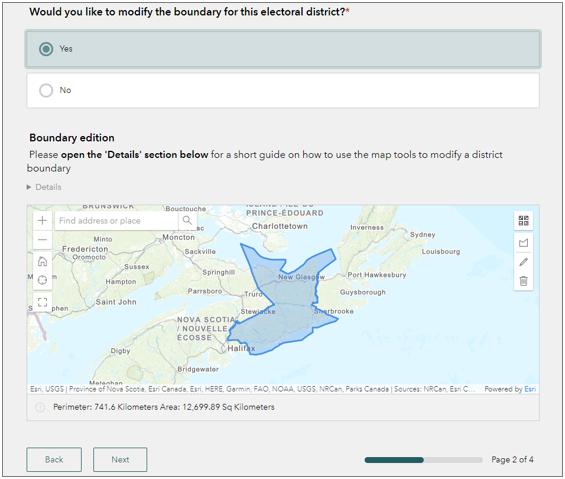
You will be asked to answer the following question: Would you like to modify the boundary for this electoral district?
If you do not want to modify the boundary, choose No and click Next.
If you want to modify the boundary, click Yes (Insert 6). If you are familiar with GIS application, you can click on the map and start your modifications.
If you are not familiar with GIS applications, click on Details under the Boundary edition section of the window to get the basic instructions on how to make changes to the boundary. Or, you can read the next part of this document that details the functionalities of the boundary modification window.
Steps to modify a boundary
There are three (3) steps to follow to modify the boundary of an electoral district:
Step 1: Expand the map area
Click on the expand button on the left side of the map. It will enlarge the map to the extent of your screen (Insert 7).
Step 2: Edit the boundary
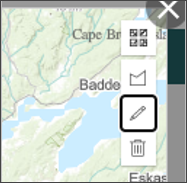
To edit the boundary, click on the pencil icon at the right side of the map (Insert 8).
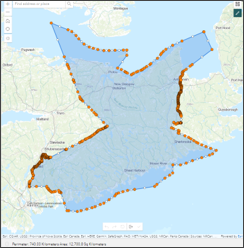
In edit mode, the boundary is represented by vertices (orange dots) (Insert 9).
Here's what you can do with the vertices:
- Move: Click and drag the vertices one by one to the desired position.
- Delete: Right click on the vertices.
- Add: Click on the white dots to add vertices. Then you will be able to move them.
At the bottom of the screen, there are other tools you can use (Insert 10).
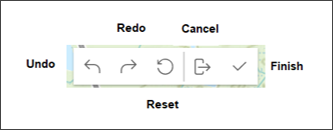
From left to right:
- Undo: To undo the last move. You can use Undo multiple times to undo multiple moves.
- Redo: To repeat the previously undone move.
- Reset: Returns the boundary to its original position while staying in edit mode.
- Cancel: Returns the boundary to its original position and exits the edit mode.
- Finish: Saves your modifications and exits the edit mode.
When you are ready, zoom in on an area of interest and start your modifications. Please note that you can modify the boundary in multiple areas of the electoral district.
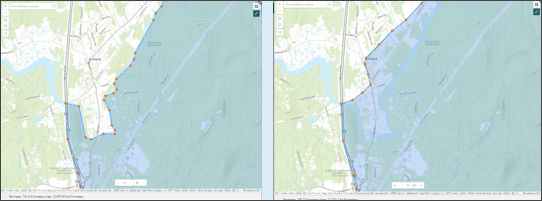
For example, let's say that you would like to propose moving the boundary on the highway instead of the waterway. Start by zooming in on the area of interest and then move the vertices. For an example of what the before and after pictures could look like, see Insert 11.
Step 3: Save your modification and exit
When you are satisfied with your changes, click Save at the bottom of the screen.

Then click on the Exit large map button on the left side of the map to return to the questionnaire.
Click Next at the bottom of the page to proceed to the next part.
Part 3 – Justification
Here, you can provide further details to help the commission better understand your modification proposal (Insert 12). This step is mandatory.
You can also attach documents to support your submission (Insert 12). Note that an attachment must not exceed 10 MB in size. When you are done, click Next.

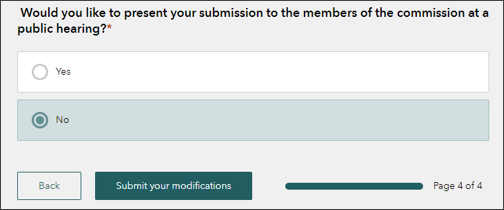
Part 4 – Representation at a public hearing
Members of the public can present their modification proposals to the commission at a public hearing. To make a representation at a public hearing, you need to submit a written request to the commission. This part of the questionnaire allows you to do that.
Please note that you can submit your modification proposal to a commission without making a representation at a public hearing. The commission will study your submission nonetheless.
If you do not want to make a representation at a public hearing
Choose No and click on Submit your modification (Insert 13).
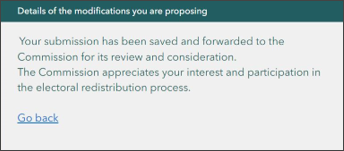
After clicking on the Submit your modifications button, you will get a confirmation that the modifications were sent to the commission (Insert 14).
You will then receive an email with a link that will allow you to access your submission to provide further details if necessary.
Click on Go back to return to the IMT home window.
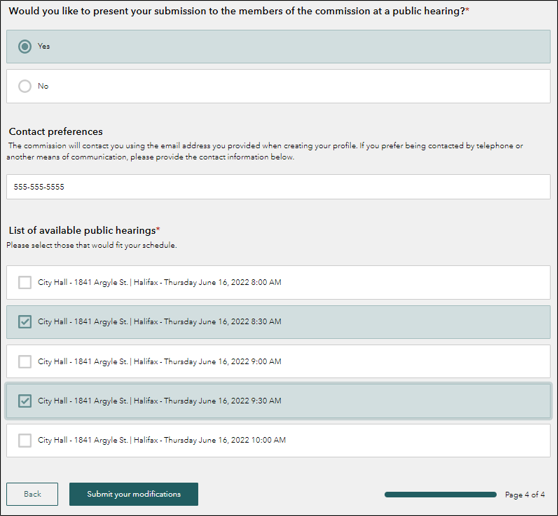
If you want to make a representation at a public hearing...
Select Yes and provide the following information (Insert 15):
- Contact preferences: If you do not want the commission to use the email address you used to create your account, please provide other means to reach you. Otherwise, leave this field blank.
- List of available public hearings: Select all the public hearings that would suit your schedule. You must select at least one.
- To finish the process, click on Submit your modifications (Insert 15).
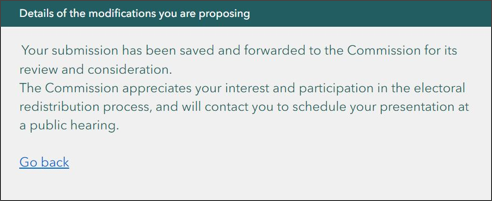
After clicking on the "Submit your modifications" button, you will get a confirmation that the modifications were sent to the commission and that they will contact you to schedule your representation (Insert 16).
You will then receive an email with a link that will allow you to access your submission to provide further details if necessary.
Click on Go back to return to the IMT home window.